 [ Screenshot: configuration screen — full card view ]images/config-overview.png
Real-Time Fraud Detection and Blocking
– by WolfPaw
for Miva Merchant
User Guide
—
Pre-payment fraud screening powered by MaxMind minFraud. Screens every checkout attempt before payment is captured, and records the MaxMind result on each order. Includes IP velocity protection, Google Storebot handling, query caching, proxy/CDN detection, whitelisting, screening statistics, and detailed email notifications. Ships in two installable variants — a System Extension and a Component — with identical screening.
WolfPaw Hosting and Development LLC
antifraud@wpcomp.com | https://www.wpcomp.com
WolfPaw Antifraud integrates MaxMind's minFraud service into your Miva Merchant store to screen orders before payment is captured. Every checkout attempt is evaluated against MaxMind's fraud-detection network, built on transaction data contributed by merchants worldwide.
Depending on the service tier you select, minFraud assesses dozens of data points across five areas:
| Requirement | Details |
|---|---|
| Miva Merchant | Miva Merchant version 10.x. |
| Database | MySQL / MariaDB recommended. MivaSQL is supported on a fresh install. |
| MaxMind account | A minFraud account at maxmind.com. minFraud queries are pay-as-you-go — you buy service credit; there is no subscription plan to choose. A free account with 1,000 risk score queries is currently available. |
| WolfPaw module registration code | Provided by WolfPaw when you purchase a license for this module. |
The module is distributed as a compiled Miva module file (.mvc) in two variants. You install
them through your Miva Merchant admin. If you already have a previous version installed, follow the upgrade
instructions below, which preserve your configuration settings. To find out which variant — System Extension
or Component — you are currently running, check the title box on the admin configuration screen.
Both variants run the same screening and share the same configuration screen, tables, order fields and email notifications. They differ only in how screening is triggered.
| Variant | File | How it triggers | Choose it for |
|---|---|---|---|
| System Extension | wp_antifraudv10903_module.mvc | Runs at the beginning of the checkout (OUSL) page — no template editing. | Standard Miva checkout. |
| Component | wp_antifraudv10903_component.mvc | Runs when a page template renders the module's Fraud Check component item. | One-page checkouts and highly customized stores where a global checkout hook is not available or appropriate. |
You need a WolfPaw module registration code — tied to your Miva Domain License number, shown under Settings › Domain Settings › Information on the License # line — and a MaxMind account with an Account ID and license key. Install one variant; the steps differ slightly.
wp_antifraudv10903_module.mvc, and note where you saved it on your PC.wp_antifraudv10903_module.mvc. Select the file, then click Open and Upload.No template changes are needed — the System Extension runs automatically at the beginning of the checkout (OUSL) page.
Use this variant for custom or one-page checkouts where the System Extension doesn't fire.
wp_antifraudv10903_component.mvc, and note where you saved it on your PC.wp_antifraudv10903_component.mvc. Select the file, then click Open and Upload.<mvt:item name="wp_antifraud" param="fraud_check" />
wp_antifraud in the list, and switch it On (it turns green).Screening now runs wherever that item renders. Continue to Section 6.
[ Screenshot: configuration screen — full card view ]images/config-overview.png
During the upgrade, database changes are applied automatically (including the cache, velocity, Storebot and statistics tables), your existing configuration is preserved, your current decline and processing-error screen messages are kept (the new HTML defaults are optional), separate IPv4/IPv6 whitelist fields are merged into one CIDR field, and screening statistics are carried across.
Open the configuration screen and look at the Module Information card. It shows the
installed version — WP_ANTIFRAUD v10.903 - Component Version or
WP_ANTIFRAUD v10.903 - System Extension Module Version. This is the quickest way to confirm
which variant and version are live.
The module creates five tables (prefixed with your store table prefix). You never need to edit them directly; they are listed here for reference.
| Table | Purpose |
|---|---|
WP_AMI | Module configuration (all settings on the config screen). |
WP_MinFraud_Cache | Cached screening results, so a retry on a cart with the same customer information does not consume a MaxMind query. |
WP_IP_Velocity | Declined-attempt counts per IP address. |
WP_Storebot_Cache | Google crawler addresses confirmed by reverse DNS. |
WP_Screening_Stats | Daily counters behind the Screening Statistics card. |
The two MaxMind results are stored as Order custom fields using Miva's native Custom Fields tables
(CFM_Groups, CFM_OrderFields, CFM_OrderValues). The module only
reads and writes those tables — it never creates or alters them.
After installing the module, follow these steps to configure and start screening orders.
install to
create them.You will receive a merchant notification email on every order (unless the result is served from cache) showing the MaxMind-calculated risk score and whether the order was accepted or declined. Since the decline threshold is at 100, all orders will be accepted and every email will read "Order Accepted."
Familiarize yourself with the typical risk score for your customer base. This gives you an idea of where your decline threshold should end up. We've found most legitimate orders score under 3% to 5% — but, as they say, your mileage may vary depending on your industry, customer demographics, and geographic distribution.
You can let the module decide every order from the decline threshold, or review orders yourself before shipping. Which approach you take decides where that threshold belongs, and which minFraud service you need.
Set a decline threshold and leave it. Orders scoring at or above the threshold are stopped at checkout, before payment is processed. Nothing is held for review.
This takes no ongoing effort, and no money ever changes hands on a blocked order. A declined customer does see your decline message, which can invite them to check their billing details and try again or to call you — so the sale is not necessarily lost. But you never see the order yourself, and never get the chance to judge a borderline case that the threshold decided against.
Lower the decline threshold gradually to a value above your normal range. A common progression is:
100 (monitor only) -> 50 -> 30 -> 15 -> fine-tune from there
Because nothing is reviewed, the threshold is the only thing standing between a bad order and your warehouse — which is why it ends up close to your normal scores.
If you are accustomed to reviewing orders before they ship, and would rather the module declined only the most egregious and obvious fraud, set the Decline Threshold to around 75 and review everything below it yourself using the two MaxMind order fields described in Section 7.
You can afford the higher figure precisely because the orders that would have been false positives are now looked at rather than refused. This is the approach many merchants arrive at once they have watched real scores for a few weeks — it blocks what is obviously fraudulent without anybody looking at it, and puts a human judgement on the genuinely ambiguous middle, which is where almost all false positives live.
Manual review needs Insights or Factors. A Score query returns a number and nothing else, so reviewing an order would mean judging it on the same figure the threshold already acted on. Insights returns the detail you actually read — and costs one cent more per order. Factors adds the specific reasons behind each score. The tier is a setting in the module's admin configuration screen, not a different plan, so you can change it whenever you like.
The module's configuration screen is organized into cards, documented below in the order they appear. Changes are saved with the Update button.
Displays the installed module version, developer information, module description, and documentation links. No configuration needed. Use this to verify the correct variant and version are deployed.
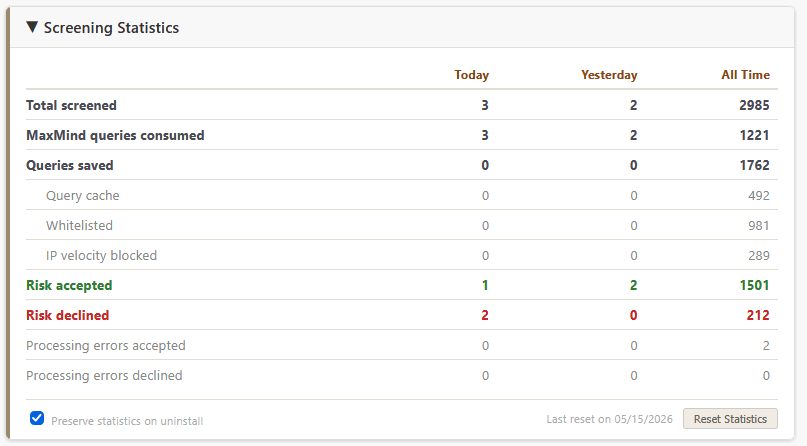
A collapsible panel showing what the module has done, in three columns: Today, Yesterday and All Time. Click to expand it.
| Row | Shows |
|---|---|
| Total screenings | Orders that went through the screening path |
| MaxMind queries consumed | How many of those actually cost a query |
| Queries saved | Broken out by query cache, whitelist, Google Storebot and velocity protection |
| Risk decisions | Accepted and declined on risk score |
| Processing errors | Accepted or declined under your error policy |
The gap between total screenings and queries consumed is what caching, whitelisting and velocity protection are saving you.
Preserve statistics on uninstall (checkbox, on by default) keeps the counters if the module is uninstalled or the variant is switched. Reset Statistics starts a new counting period — useful at the start of a quarter, or after changing your thresholds. Resetting clears counters only; orders, order fields and the daily log are untouched, and the action requires a second click to confirm.
 [ Screenshot: Screening Statistics card (expanded) ]images/card02-stats.png
The master switch.
| Field | Description | Default |
|---|---|---|
| Enable Fraud Screening | Master switch. Turn on to activate pre-payment screening. Requires a valid WolfPaw license and MaxMind credentials. | Off |
The card header shows the current state unmistakably — a green Enabled or a red Disabled — so a store that is not actually screening is easy to spot at a glance.
| Field | Description | Default |
|---|---|---|
| Module Registration Code | Your WolfPaw registration code for the module. | (empty) |
| I agree to the End User License Agreement | Must be checked to operate the module. | Unchecked |
| Field | Description | Default |
|---|---|---|
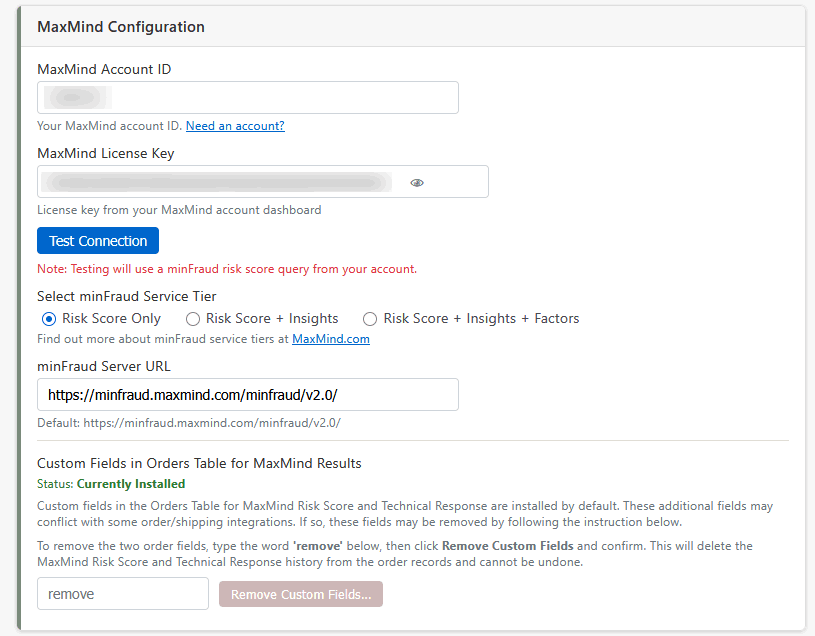
| MaxMind Account ID | Your numeric MaxMind account ID. Found on the MaxMind dashboard under Account › Account Information. | (empty) |
| MaxMind License Key | A license key generated in your MaxMind account under Account › Manage License Keys. | (empty) |
| Select minFraud Service Tier | Which minFraud service each query uses. See below. | Risk Score Only |
| minFraud Server URL | The MaxMind API endpoint. Change only if directed by MaxMind support. | https://minfraud.maxmind.com/minfraud/v2.0/ |
There is no subscription or plan to choose. minFraud queries are pay-as-you-go — you buy service credit, and the service selected here determines what each query returns and what it costs. You can change it at any time; the change takes effect on the next order.
| Service | * Per query | Returns |
|---|---|---|
| Risk Score Only | $0.005 | The risk score and an IP risk score. Enough to accept and decline orders automatically. |
| Risk Score + Insights | $0.015 | Everything in Score, plus the detail: IP geolocation, network traits, email history, address distance checks. This is what you read when reviewing an order. |
| Risk Score + Insights + Factors | $0.020 | Everything in Insights, plus the specific reasons a score came out high or low. Also useful when reviewing an order. |
Use the Test Connection button (see Section 8) to verify your credentials before enabling screening. * Query prices as of October 2026.
At the bottom of this card is the control that installs or removes the two MaxMind order fields (MM Risk Score and MM Technical Response). It shows the current state — Currently Installed or Not Installed — derived by checking whether the fields exist, so it stays correct even if the fields are changed directly in Miva.
remove in the confirm box and Update to delete the two fields and
their recorded values. The Additional Order Information group is left in place. This removes the MM Risk
Score and MM Technical Response for every order — on the Orders page and in the order history — and
cannot be undone.install and Update to create (or repair) the two fields.The fields are created automatically on install and upgrade, so most stores never need this control — it exists so you can remove the fields cleanly (in case of conflicts with certain shipping or order integrations), or reinstall them if they were deleted. See Section 7.
 [ Screenshot: MaxMind Configuration card ]images/card05-maxmind.png
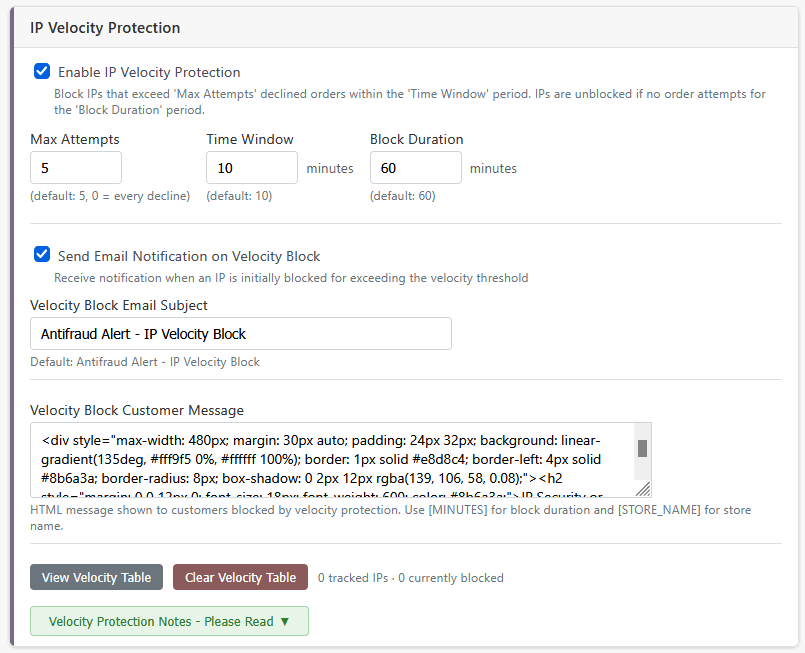
Tracks how many times a given IP address is declined. After exceeding the threshold within the configured time window, the IP is temporarily blocked from placing orders — no minFraud query is consumed during the block period. This is what stops card-testing runs.
| Field | Description | Default |
|---|---|---|
| Enable IP Velocity Protection | Turn on IP-based velocity blocking. | Off |
| Max Attempts | Number of declined orders from the same IP before it is blocked. 0 means block on every decline. | 5 |
| Time Window (minutes) | Rolling window in which declined attempts are counted. | 10 |
| Block Duration (minutes) | How long a blocked IP must wait before attempting checkout again. | 60 |
| Send Email Notification on Velocity Block | Send a notification email when an IP is velocity-blocked. | On |
| Velocity Block Email Subject | Subject line for velocity block notification emails. | Antifraud Alert - IP Velocity Block |
| Velocity Block Customer Message | Message shown to blocked customers. Use [MINUTES] for remaining block time and [STORE_NAME] for your store name. | (template) |
Only declined attempts count. A customer who orders repeatedly and passes screening each time is never blocked.
When an address reaches the attempt limit, the module also deactivates the basket session used for those attempts, so an attacker cannot continue with the same cart after clearing cookies. Adding an address to the whitelist clears any velocity block on it. Use View / Clear Velocity Table (Section 8) to inspect or reset the tracking data.
 [ Screenshot: IP Velocity Protection card ]images/card06-velocity.png
When enabled, the module caches the risk-score result for each unique combination of customer and device identity data. If the same customer retries checkout with the same identity and device, the cached result is returned without consuming another minFraud query credit. Trivial differences such as capitalization or phone number formatting do not defeat it.
| Field | Description | Default |
|---|---|---|
| Enable minFraud Query Caching | Turn on caching of minFraud results. | Off |
| Prune Cached Queries After (minutes) | How long a cached result remains valid. Expired entries are pruned automatically. Setting to 0 effectively disables the cache. | 10 |
A cache entry applies only to the cart information it was created for, with the exception of order amounts and contents, so a customer's second, separate order (a new basket) is always screened afresh. If the customer materially changes their address, the cache does not apply and a new query is made — which is correct, because it is a different transaction to assess.
Automatic cache purge: when the IP whitelist is changed, cached whitelist entries are purged. When the decline or email threshold is changed, the query cache is also purged. This ensures cached decisions always reflect current settings.
| Field | Description | Default |
|---|---|---|
| Email From Address | The sender (From:) address for all fraud notification emails. | antifraud@<your store domain> |
| Email To Address(es) | Recipient address(es) for fraud alerts. Your store email by default. Separate multiple addresses with commas. | (store email) |
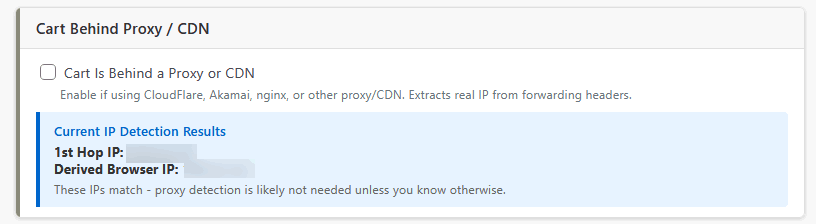
If your store is behind a CDN (CloudFlare, AWS CloudFront) or a reverse proxy (Nginx, Varnish), the client's real IP may be in a forwarded header. Enable this setting so the module reads the correct IP from CF-Connecting-IP, True-Client-IP, X-Real-IP, or X-Forwarded-For headers.
| Field | Description | Default |
|---|---|---|
| Cart Is Behind a Proxy or CDN | Turn on if your store is behind any proxy, load balancer, or CDN. | Off |
The card displays a Current IP Detection Results box with your 1st Hop IP and Derived Browser IP. If these differ, your store is behind something and this setting should be on. If the module reports a private address such as 10.0.0.5 or 192.168.1.20 as the customer's IP, you will receive a processing error notification naming the cause.
 [ Screenshot: Cart Behind Proxy / CDN card ]images/card09-proxy.png
Whitelisted IPs bypass fraud screening entirely. No minFraud query is consumed.
| Field | Description | Default |
|---|---|---|
| Whitelisted IP Addresses | IP addresses to whitelist, comma-separated. Supports IPv4, IPv6 and CIDR ranges. | (empty) |
| Automatically Whitelist Google Storebot | Recognize and bypass verified Google Storebot requests. See below. | Off |
| Send Email Notification for Whitelisted Orders | Send a notification email when a whitelisted IP places an order. | On |
| Whitelisted Order Email Subject | Subject line for whitelist notification emails. | Antifraud Report - IP Whitelisted |
203.0.113.9
198.51.100.0/24
2001:db8::/32
If you list products on Google Shopping or Google Merchant Center, Google runs periodic automated checkout verification tests against your store. These are not real orders and not fraud attempts — but they look like repeated automated checkouts, so without special handling they consume MaxMind queries, and repeated declines can accumulate in the velocity table until Google is blocked outright. Your Shopping listings would then fail verification, with nothing in the admin explaining why.
With Automatically Whitelist Google Storebot on, requests are identified by user agent and then confirmed by address — the user agent is only a gate, so every request is confirmed independently before it is trusted.
| Step | What happens |
|---|---|
| Published ranges | The address is checked against Google's published crawler ranges (IPv4 and IPv6). No lookup needed. |
| Cached result | An address confirmed previously is recognized immediately. |
| Reverse DNS | Addresses outside the published ranges are confirmed by a reverse-DNS lookup whose result is validated back to the connecting address, then cached. This is the only step that adds any delay, and only the first time a particular address is seen. |
When enabled, the module sends at most two Storebot emails per active day: an alert when verified Storebot activity first begins that day, and a summary the following morning showing the day's total checkout tests, the number of unique addresses, and how each was confirmed.
| Field | Description | Default |
|---|---|---|
| Enable Logging | Write screening activity to a daily log file. | On |
| Log Retention (days) | Automatically delete log files older than this many days (1–365). | 30 |
Logs are written to the wp-antifraud.logs/ directory, one file per day named
antifraud-YYYY-MM-DD.log. The card includes a built-in Log Files viewer so
you can read a day's log without leaving the admin. Log entries are prefixed with basket and pending-order
identifiers, so all lines for one transaction can be traced together. When contacting support about a
specific order, those identifiers from the alert email are the quickest way to locate it.
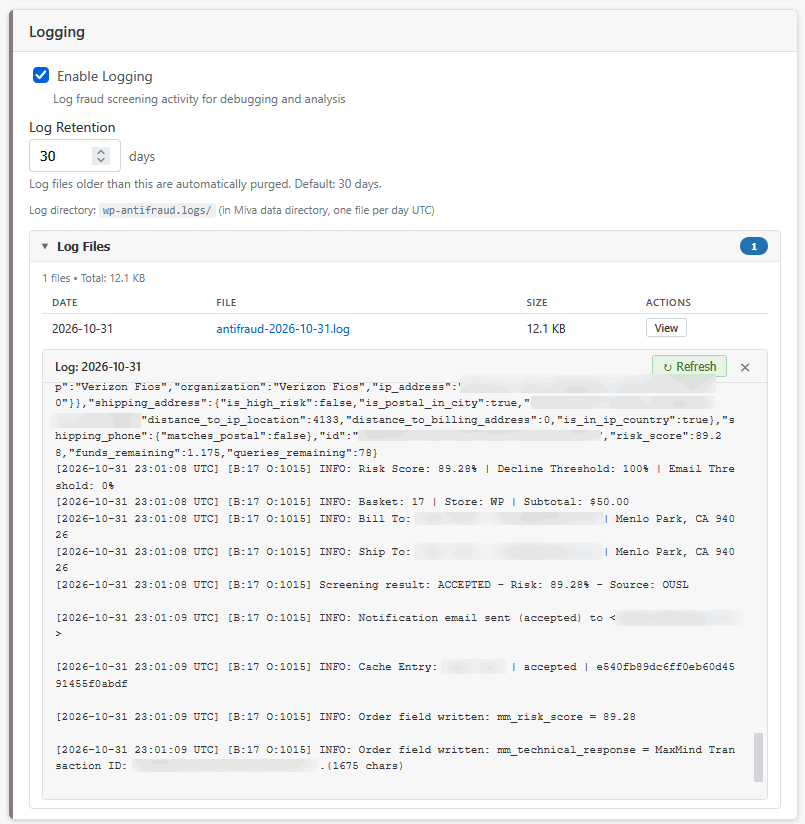 [ Screenshot: Logging card + Log Files viewer ]images/card11-logging.png
| Field | Description | Default |
|---|---|---|
| Risk Threshold for Email Notification | Send a fraud report email when the risk score is at or above this percentage. Set to 0 to receive email on every screened order. | 0 |
| Email Subject | Base subject for fraud report emails. The risk percentage and disposition are appended automatically. | Antifraud Report - |
| Risk Threshold for Order Decline | Automatically decline orders with a risk score at or above this percentage. Set to 100 to disable automatic declining. | 100 |
| Screen Message on Order Decline | Message shown to the customer when their order is declined. Use [STORE_NAME] for your store name. | (template) |
The risk score is a probability, not a verdict. A score of 10 means MaxMind estimates roughly a 10% chance the transaction is fraudulent — so about one order in ten at that score genuinely is. There is no score at which fraud is impossible, and no threshold that blocks all fraud without also blocking legitimate customers. Section 5 covers where to set it.
Because declines can sometimes be legitimate customers rather than fraudsters, the wording of the decline message matters: a message that invites them to check their billing details and try again recovers sales that a blunt refusal loses. Include a phone number or email address so they can reach you.
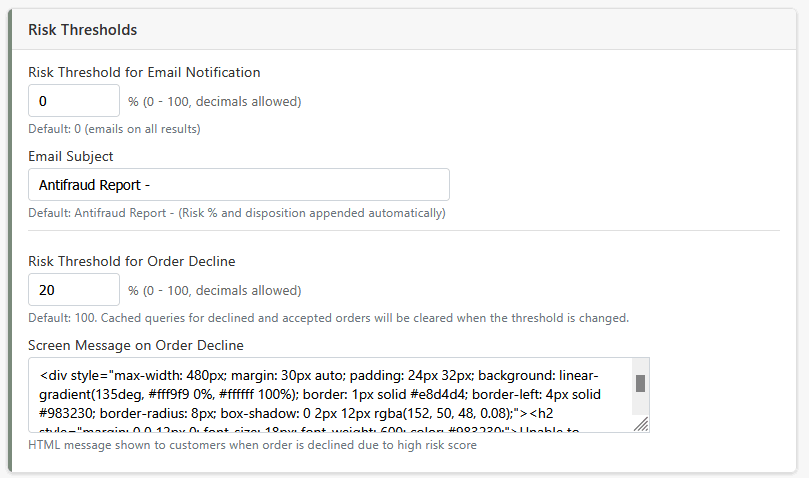 [ Screenshot: Risk Thresholds card ]images/card12-thresholds.png
Controls what happens when MaxMind is unreachable, returns an error, or the module encounters an unexpected problem during screening.
| Field | Description | Default |
|---|---|---|
| Order Disposition on Processing Error | Accept Order (recommended): allow the order to proceed so you don't lose sales. Decline Order: block it. | Accept |
| Send Email Notification for Processing Errors | Send an email alert when a processing error occurs, so you're aware screening was skipped. | On |
| Processing Error Email Subject | Subject line for processing error emails. | Antifraud Processing Error |
| Screen Message on Processing Error Decline | Message shown to the customer if orders are declined on error. Use [STORE_NAME] for your store name. | (template) |
Leave notification enabled with either choice. A silent screening failure is far worse than the failure itself — without an alert, you could go weeks unscreened without knowing.
The module writes the MaxMind result to two Order custom fields, shown on your Miva admin's Orders page and in the Additional Order Information section on the order detail page. If these fields do not appear, you may need to enable them: on the Order Processing › Orders page, click the plus (+) at the right of the column headers, scroll down to Show/Hide Columns, and click Show/Hide Custom Fields. Make sure MM Risk Score and MM Technical Response are checked.
| Field (display name) | What it holds |
|---|---|
| MM Risk Score | The risk score for the order, or blank on a whitelist, Storebot, velocity-block or error outcome (where no score applies). |
| MM Technical Response | A plain-text summary of the full MaxMind result, or a short status label for the non-screened outcomes. |
Fields display alphabetically by field code within the group, so MM Risk Score appears above MM Technical Response. You can add MM Risk Score as a column on your order list from Miva's order-list column controls, so you can scan scores across many orders at once.
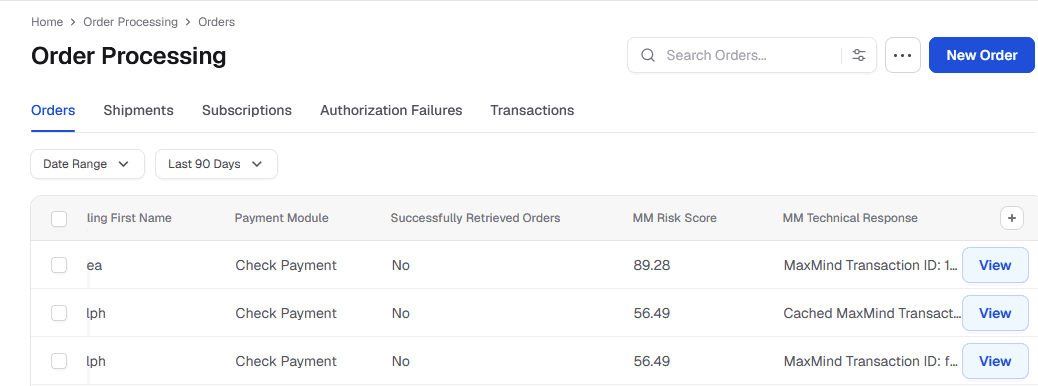 [ Screenshot: MM Risk Score + MM Technical Response columns on the Orders list ]images/order-list.png
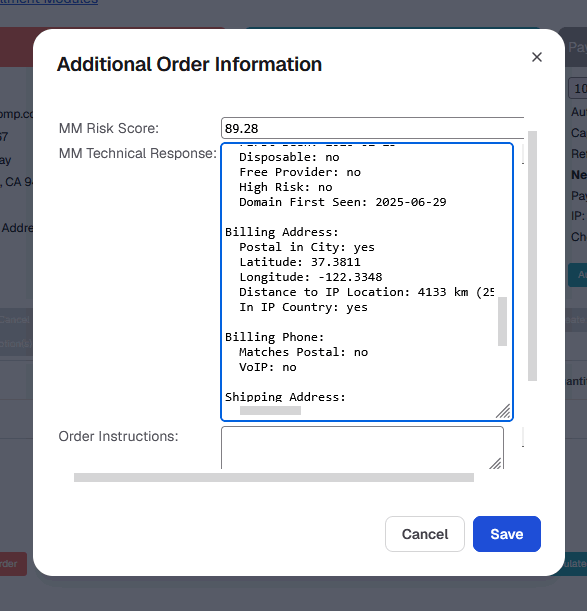 [ Screenshot: MM Risk Score + MM Technical Response on an order ]images/order-custom-fields.png
With the Insights or Factors service tier, the technical response is a flat, readable record — no raw JSON. It begins with the MaxMind transaction ID and a direct link to that transaction in your MaxMind dashboard, followed by the risk score and the sections MaxMind returned (IP address and traits, email, billing and shipping address checks, phone). With the Risk Score Only tier, the technical response shows the score and little else. These are some of the risk indicators merchants find most useful when deciding whether to ship an order:
| Signal | What it tells you |
|---|---|
| Distance to billing address | A few miles is ordinary. A different continent on a domestic order is not. |
| Email first seen | An address created today is a far weaker sign of a real customer than one first seen years ago. |
| In IP country | Whether billing and shipping match the country the customer is connecting from. |
| Free or disposable email | Disposable addresses on a high-value order deserve a second look. |
| High risk flags | MaxMind's own judgement on the email address or the shipping address. |
For the non-screened outcomes, the technical response is a short two-line label: Whitelisted,
Google Storebot, Velocity Block, a Cached prefix on a replayed
result, or Error with the cause — each followed by the relevant IP address.
The two custom order fields — MM Risk Score and MM Technical Response —
are created automatically on install and upgrade. The control at the bottom of the MaxMind Configuration card
(Section 6, Card 5) lets you remove them — values and definitions — or reinstall them, by typing
remove or install to confirm. Removing them leaves the Additional Order Information
group in place; reinstalling recreates the fields empty. But be careful — removing the custom fields deletes
the entire risk score and MaxMind response history for your orders, and it cannot be undone.
The two custom order fields are standard Miva Order custom fields. A system that reads orders through Miva's order API or templates will see them alongside any other custom fields that exist. If an integration cannot tolerate additional order custom fields, use the toggle above to remove them — screening continues to run and to log and email MaxMind results; only the on-order record is omitted.
The configuration screen includes interactive tools in addition to the configuration cards.
Verifies that your MaxMind Account ID and License Key are valid. The module sends a test query to the minFraud API and displays the response, along with your remaining account balance. A successful test shows a green result panel; a failure shows red with the error message. A failure here is almost always one of: a mistyped license key, a key generated for a different MaxMind service, or outbound HTTPS blocked by a firewall. (The test always uses a Score query, whatever tier you have selected.)
View a day's log file directly in the admin panel (Logging card). Logs are stored in
wp-antifraud.logs/ and rotate daily.
Clears the screening counters and starts a new counting period. Requires a second click to confirm. Orders, order fields and the daily log are not affected.
Screening runs at checkout — on the order checkout screen (OUSL) for the System Extension variant, or wherever the Fraud Check component item renders for the Component variant. The flow is the same for both:
The module sends up to seven types of email notification. Each is a detailed HTML report with color-coded severity for instant inbox identification.
| Email Type | When Sent | Default Subject |
|---|---|---|
| Fraud Report (Accepted) | Risk score meets the email threshold but is below the decline threshold | Antifraud Report - <risk%> - Order Accepted |
| Fraud Report (Declined) | Risk score at or above the decline threshold | Antifraud Report - <risk%> - Order Declined |
| Processing Error | MaxMind unreachable or an error during screening | Antifraud Processing Error |
| Whitelist Notification | A whitelisted IP placed an order (if enabled) | Antifraud Report - IP Whitelisted |
| Velocity Block | An IP was blocked by velocity protection. Sent once, when the IP first enters the blocked state. | Antifraud Alert - IP Velocity Block - <IP> |
| Storebot Alert | First confirmed Google Storebot activity of the day | Google Storebot Alert - <store> - Checkout testing underway |
| Storebot Summary | Next-morning summary of the previous day's Storebot activity | Google Storebot Summary (<date>) - <N> tests from <M> IPs |
Fraud report emails include customer name, email, billing and shipping addresses, IP address, risk score, order total and currency, the MaxMind response detail (which varies by service tier), and the screening decision. The subject on a fraud report shows the risk percentage and whether the order was accepted or declined, so you can triage from the inbox.
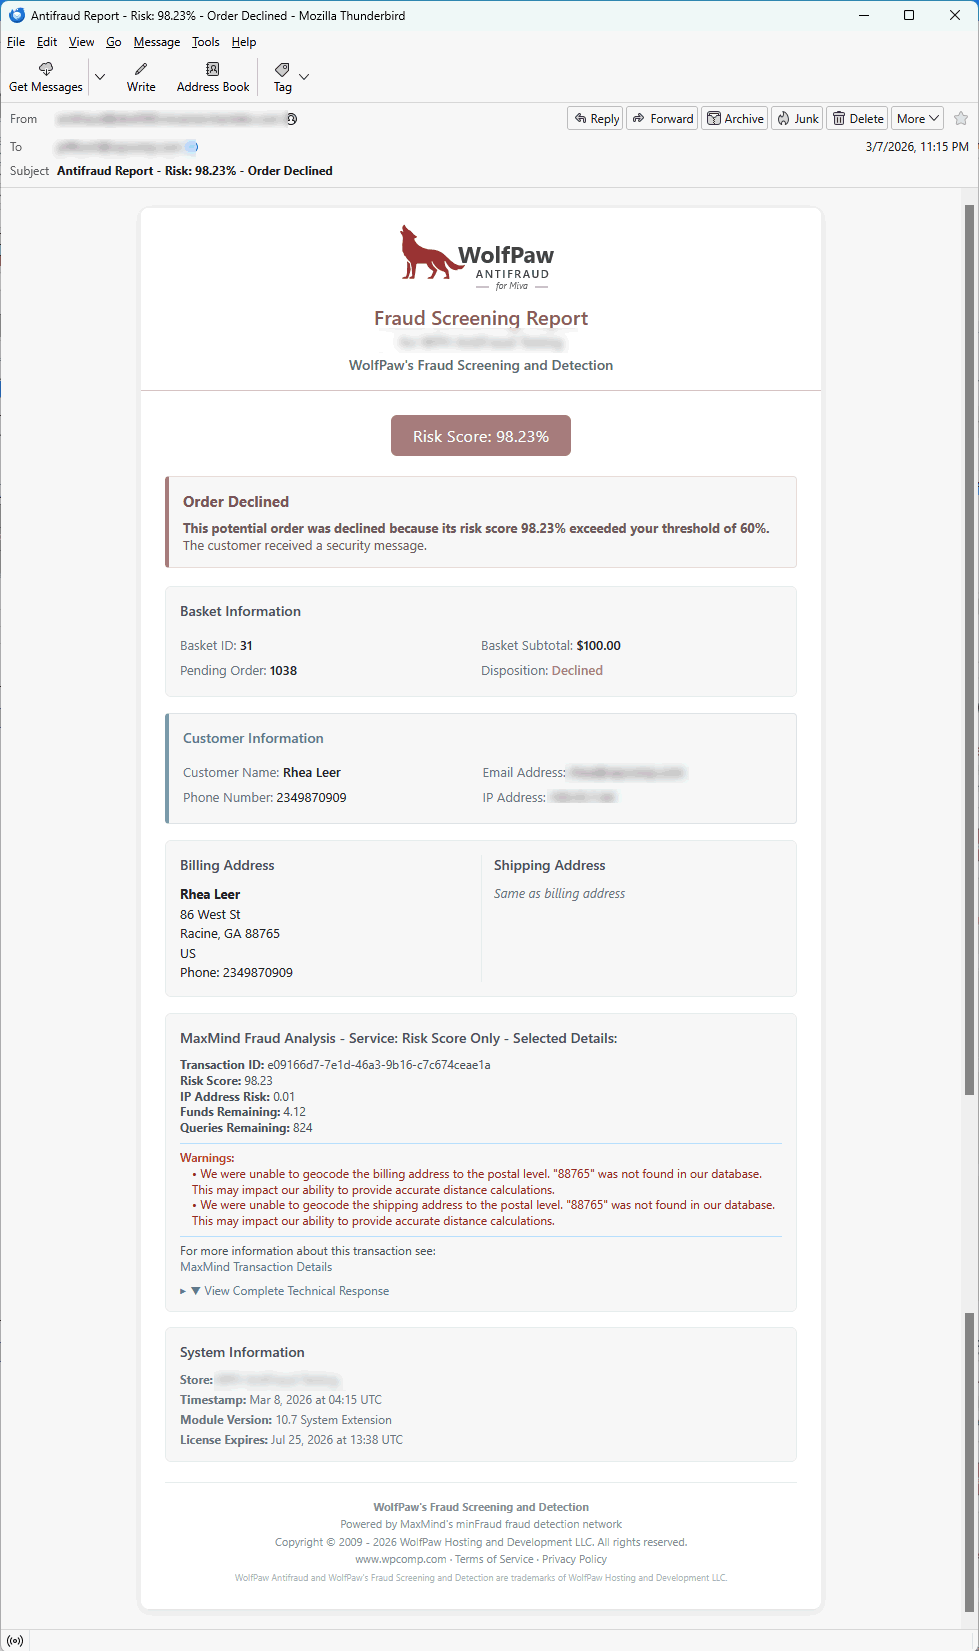 [ Screenshot: fraud notification email ]images/email-fraud-alert.png
| Symptom | Likely cause and remedy |
|---|---|
| Test Connection fails | Check the Account ID is the numeric ID of your MaxMind account (not your email) and the license key has not been revoked. Confirm the key is for minFraud, and that your server can reach minfraud.maxmind.com over HTTPS. |
| Orders are not being screened | Confirm Enable Fraud Screening is on (the status card header shows green Enabled), the WolfPaw registration code is entered and valid, and the MaxMind credentials are saved. For the Component variant, confirm the Fraud Check item is in the checkout template. Check the customer's IP is not whitelisted. |
| All orders are declined | Your decline threshold is too low. Raise it, set the email threshold to 0, and review real scores for a week before choosing a new value. |
| Emails are not being received | Verify the From and To addresses in Card 8. Confirm the From domain's SPF/DKIM/DMARC authorize your store's mail, check your store's mail settings under Settings › Domain Settings › Domain Details › Mail Settings, and check your spam folder — a handed-off email that is spam-filtered will still be recorded as sent in the daily log. |
| Every order produces a processing error naming a private IP | Your store is behind a proxy or CDN. Enable Cart Is Behind a Proxy / CDN in Card 9. |
| Staff cannot place orders in the admin | Your office address may be blocked by velocity protection. Clear the velocity table (Section 8), then add your office IP to the whitelist. |
| Velocity blocks are not working | Velocity counts declined attempts only. If your decline threshold is 100, nothing is ever declined and the block never fires. Also confirm velocity protection is enabled in Card 6. |
| Cache is not reducing minFraud queries | Enable query caching and set a TTL greater than 0. A TTL of 0 prunes entries immediately. The cache only reuses a result when the customer's shipping and billing addresses, contact info, session ID and device data are unchanged. |
| MM Technical Response shows only a few lines | You are querying the Score service, which returns only the risk score. Change the service tier to Insights or Factors in Card 5. |
| The MaxMind custom order fields are missing from the Orders page | Open Card 5 and check the Custom Fields control — if it shows Not Installed, type install. Confirm Miva's native Custom Fields feature is present (the warning banner flags this). |
| Statistics show zero after reinstalling | If "Preserve statistics on uninstall" was off when you uninstalled, the counters were cleared. Upgrading in place does not clear them. |
To stop screening without removing the module, set Enable Fraud Screening to off in Card 3. To remove the module entirely, uninstall it from the Miva admin module manager. For the Component variant, also remove the Fraud Check item from your template.
Uninstalling leaves your order data intact: the two MaxMind order fields and their recorded values remain on your orders, and your screening statistics are preserved when Preserve statistics on uninstall is on (the default).
remove) while the module is still installed. Uninstalling
the module does not remove those fields. You can also remove them later from Settings › Utility
Settings › Custom Fields in your Miva admin.| Channel | Details |
|---|---|
| antifraud@wpcomp.com | |
| Website | https://www.wpcomp.com |
| MaxMind Documentation | https://dev.maxmind.com/minfraud/ |
When contacting support, please include your Miva Merchant version, which variant and module version
are shown on the Module Information card, your Miva Domain License number, and any relevant lines from the
daily log — from the module's built-in log viewer or the wp-antifraud.logs/ directory. The
basket and order identifiers from an alert email are the quickest way for us to locate a specific
transaction.
The minFraud risk score is a percentage from 0.01 to 99 representing the probability that a transaction is fraudulent. A score of 5.00 means roughly a 5% chance the order is fraudulent.
| Scenario | Decline | Rationale | |
|---|---|---|---|
| Conservative start | 0 | 100 | Monitor only. Review emails to learn your score distribution. Temporary — velocity protection does not fire while nothing is declined. |
| Moderate | 2 – 5 | 10 – 20 | Good general-purpose range for merchants who do not review orders. |
| Aggressive | 1 – 2 | 5 – 10 | Tighter screening for merchants with thin margins. |
| Manual review | 0 – 5 | 75 | Block only obvious fraud; review the rest before shipping. |
Your ideal decline threshold depends heavily on your gross profit margin. The fundamental question is: does the cost of a fraudulent chargeback outweigh the cost of a lost sale?
As a rule of thumb: the lower your margin, the lower your decline threshold should be — unless you review orders manually, in which case you can set it higher and judge the middle ground yourself.
You can block orders from specific countries through your MaxMind account — this is done on MaxMind's side, not in the module:
remove, then confirm — to guard against accidental deletion of recorded
order history.Copyright ©
WolfPaw Hosting and Development LLC. All rights reserved.
Real-Time Fraud Detection and Blocking is proprietary software. Unauthorized distribution is prohibited.